Using Deep Learning Models
With deep learning / convolutional neural networks complex problems can be solved and objects in images recognized. This chapter briefly outlines the recommended approach for using convolutional neural networks in eCognition, which is based on deep learning technology from the Google TensorFlow ™ library. Note - Since eCognition Version 10.5 models created using eCognition's 'create convolutional neural network' algorithm no longer run on GPU.
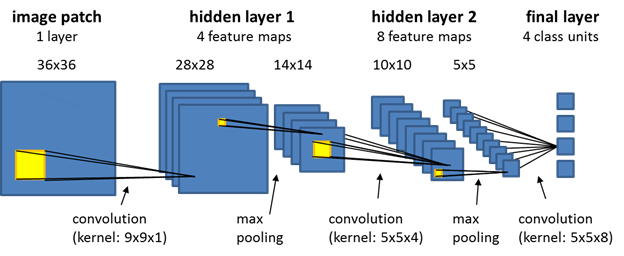
The term convolutional neural networks refers to a class of neural networks with a specific network architecture (see figure below), where each so-called hidden layer typically has two distinct layers: the first stage is the result of a local convolution of the previous layer (the kernel has trainable weights), the second stage is a max-pooling stage, where the number of units is significantly reduced by keeping only the maximum response of several units of the first stage. After several hidden layers, the final layer is normally a fully connected layer. It has a unit for each class that the network predicts, and each of those units receives input from all units of the previous layer.

The workflow for using convolutional neural networks is consistent with other supervised machine learning approaches. First, you need to generate a model and train it using training data. Subsequently, you validate your model on new image data. Finally - when the results of the validation are satisfactory - the model can be used in production mode and applied to new data, for which a ground truth is not available.
As an alternative to this workflow using an eCognition TensorFlow model (semantic segmentation), you can load and apply third-party pre-trained semantic segmentation (pixel classification) models in the following formats:
-
TensorFlow (SavedModel) - Google TensorFlow model format (object detection, semantic, and instance segmentation)
-
ONNX model - open standard for machine learning models (Open Neural Network Exchange) that enables interoperability between different frameworks (object detection, semantic, and instance segmentation)
Please take a look at these videos where you learn basic steps using Deep Learning in eCognition:
Deep Learning 1 of 4: Introduction and Set-up
Deep Learning 2 of 4: Creating Samples
Deep Learning 3 of 4: Create / Train / Save CNN
Deep Learning 4 of 4: Apply CNN with OBIA
Train a convolutional neural network model
We suggest the following steps:
Step 1: Classify your training images based on your ground truth, using standard rule set development strategies. Each classified pixel can potentially serve as a distinct sample. Note that for successful training it is important that you have many samples, and that they reflect the statistics of the underlying population for this class. If your objects of interest are very small, you can classify a region around each object location to obtain more samples. We strongly recommend to take great care at this step. The best network architecture cannot compensate for inadequate sampling.
Step 2: Use the algorithm 'generate labeled sample patches' to generate samples for two or more distinct classes, which you want the network to learn. Note that smaller patches will be processed more quickly by the model, but that patches need to be sufficiently large to make a correct classification feasible, i.e., features critical for identification need to be present.
After you have collected all samples, use the algorithm 'shuffle labeled sample patches' to create a random sample order for training, so that samples are not read in the order in which samples were collected.
Step 3: Define the desired network architecture using the algorithm 'create convolutional neural network'. Start with a simple network and increase complexity (number of hidden layers and feature maps) only if your model is not successful, but be aware that with increasing model complexity it is harder for the training algorithm to find a global optimum and bigger networks do not always give better results.
In principle, the model can already be used immediately after it was created, but as its weights are set to random values, it will not be useful in practice before it has been trained.
Step 4: Use the algorithm 'train convolutional neural network' to feed your samples into the model, and to adjust model weights using backpropagation and statistical gradient descent. Perhaps the most interesting parameter to adjust in this algorithm is the learning rate. It determines by how much weights are adjusted at each training step, and it can play a critical role in whether or not your model learns successfully. To train for a full epoch (i.e. every sample in your training data set is seen exactly once by the model) you have to adjust the train steps parameter to the number of available samples (Deep Learning Features) divided by the batch size (= the number of samples presented at each training step). We recommend monitoring the classification quality of your trained model from time to time using the algorithm 'convolutional neural network accuracy' (e.g. after each epoch), and also to re-shuffle samples from time to time ('shuffle labeled sample patches') , e.g. every few epochs.
Step 5: Save the network using the algorithm 'save convolutional neural network' before you close your project.
Validate the model
Here we suggest the following steps:
Step 1: Load validation data, which has not been used for training your network. A ground truth needs to be available so that you can evaluate model performance.
Step 2: Load your trained convolutional neural network, using the algorithm 'load 2D deep learning model'. Select the Model format > ONNX model or TensorFlow (SavedModel format) in case you have a pre-trained semantic segmentation (pixel classification) model.
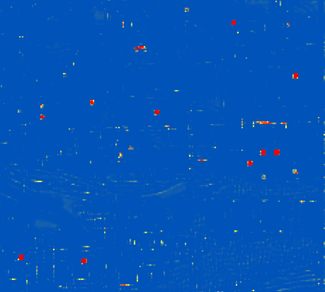
Step 3: Generate heat map layers for your classes of interest by using the algorithm 'apply 2D deep learning model'. Values close to one indicate a high target likelihood, values close to zero indicate a low likelihood.
Step 4: Use the heat map to classify your image, or to detect objects of interest, relying on standard ruleset development strategies.
Step 5: Compare your results to the ground truth, to obtain a measure of accuracy, and thus a quantitative estimate of the performance of your trained convolutional neural network.

Use the model in production
Here we suggest the following steps:
Step 1: Load image data that you want to process (a ground truth is not needed anymore at that stage, or course).
Step 2: Load your deep learning model, apply it to generate heat maps for classes of interest, and use those heat maps to classify objects of interest (see Steps 2, 3, and 4 in chapter Validate the model).
Learn more:
Deep Learning Algorithms (Reference Book)
Deep Learning Features (Reference Book)
Webinar - Mapping of Rock Glaciers Using Deep Learning
